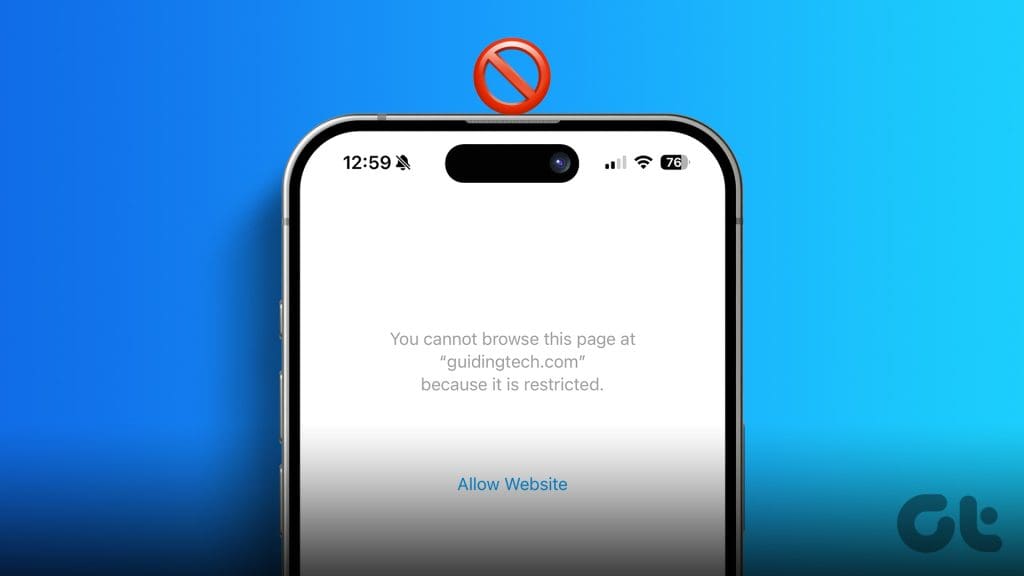
Have you ever found yourself losing track of time and scrolling through social media for hours? Or you may be concerned about the same for your kid. It’s easy to get on the slippery slope of mindless scrolling, but worry not. This article will help you fix this and maintain a digital discipline. Here are the three easiest ways to block or restrict a website on a Mac or iPhone.
We will use the Screen Time feature to block and restrict websites on your Mac and iPhone. This method will also work if you are looking for a way to block or restrict websites on your iPad; follow the steps for the iPhone. Let’s get started.
But First, Set a Screen Time Passcode
Apple allows you to set a Screen Time passcode so that you or others cannot easily bypass these restrictions. So, you must enter this passcode whenever you or someone else wants to bypass it. This is helpful if you give your kid your iPhone or Mac or set up their new devices. Let’s look at the steps.
Tip: Skip to the next section if you’ve already set up a Screen Time passcode on your Mac and iPhone.
On iPhone
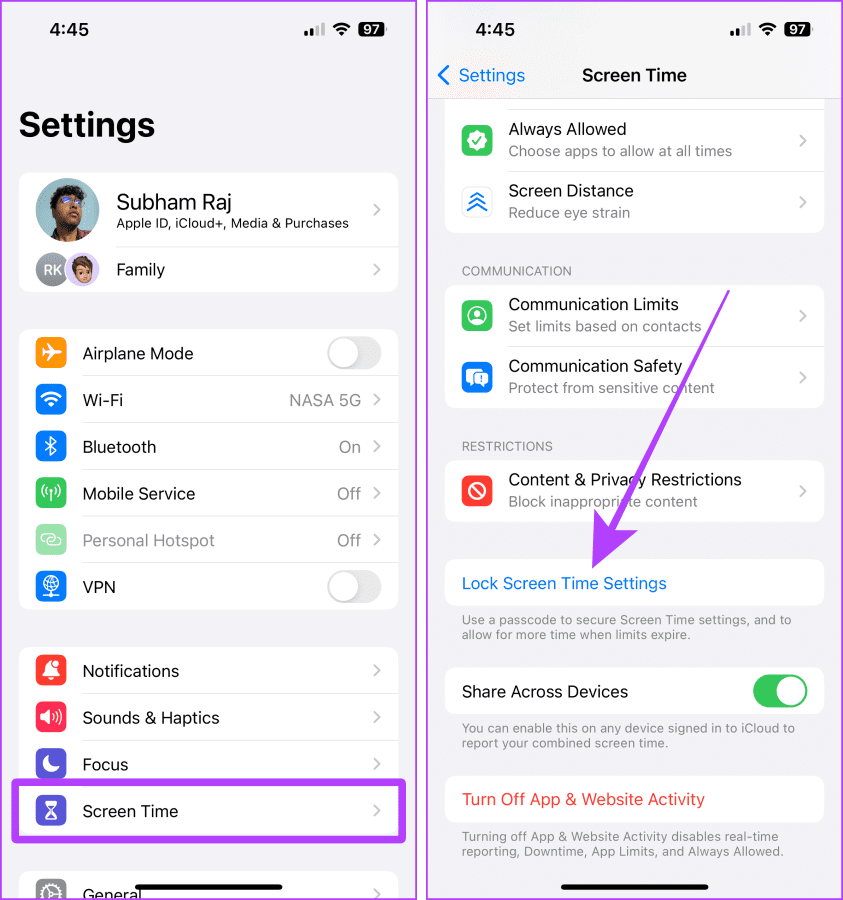
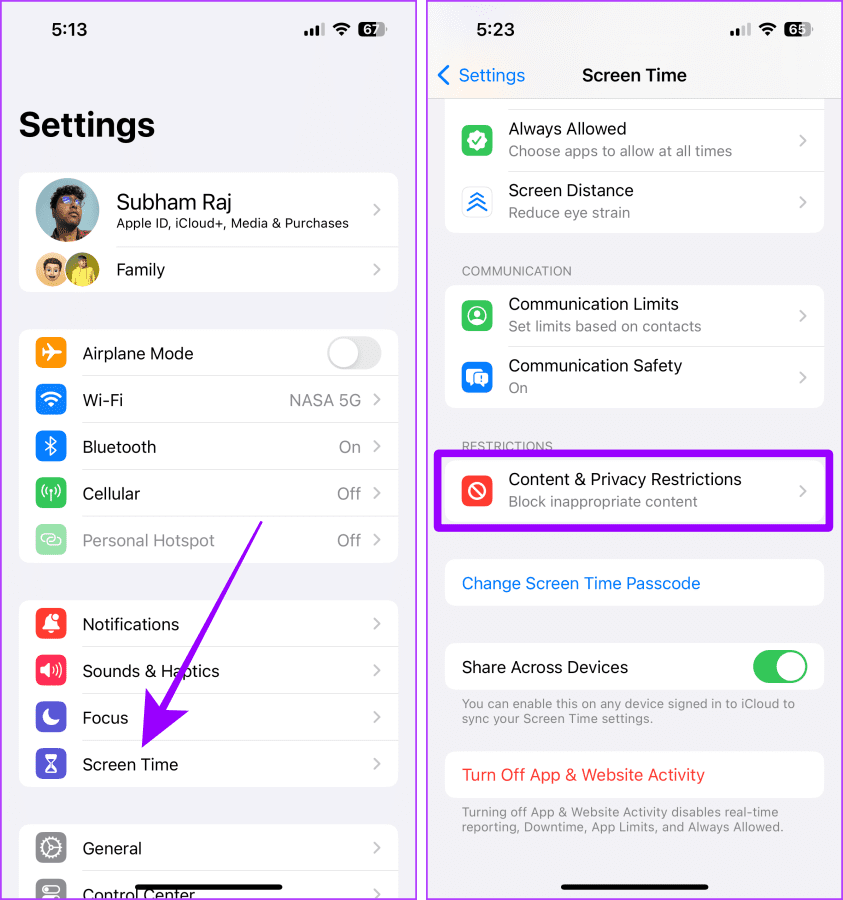
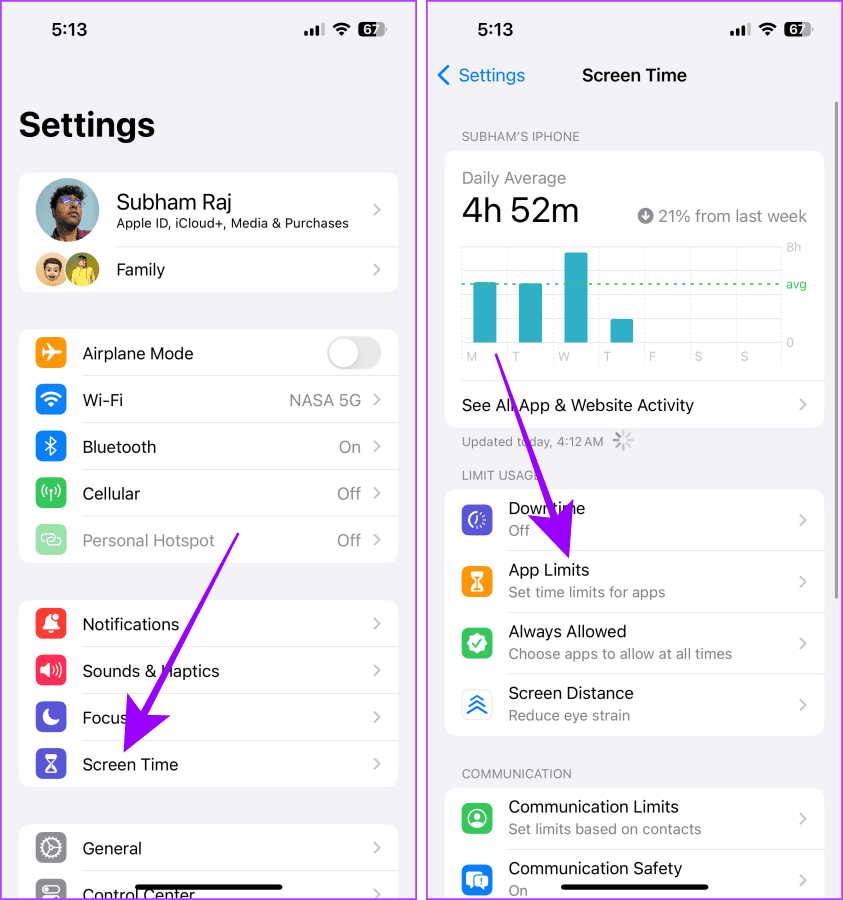
Step 1: Launch the Settings app on your iPhone and tap Screen Time.
Step 2: Tap ‘Lock Screen Time Settings’.
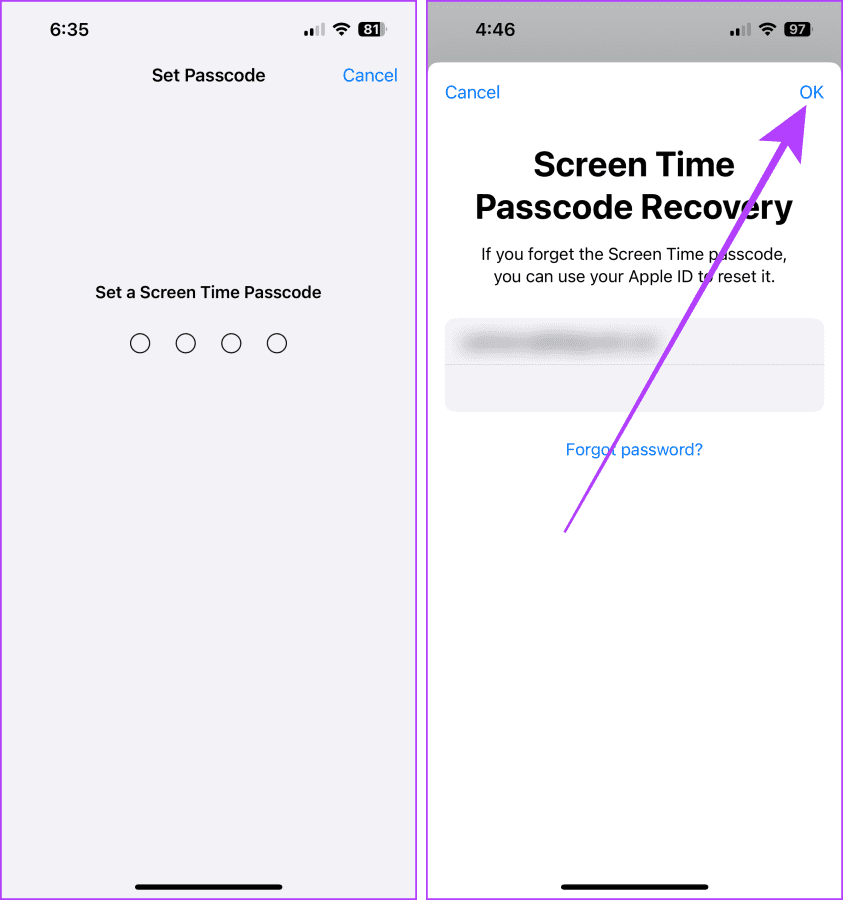
Step 3: Type a unique passcode for Screen Time.
Step 4: Type your Apple ID and password on the next screen and tap OK.
Note: Adding Apple ID to Screen Time will help you recover the Screen Time passcode if you forget it.
On Mac
Note: If the family member has an administrator account, you will be prompted to convert it to a standard account. Because, an administrator account can bypass the Screen Time passcode. So, ensure that you either convert, add, or remove the administrator account or create a new standard user on your Mac.
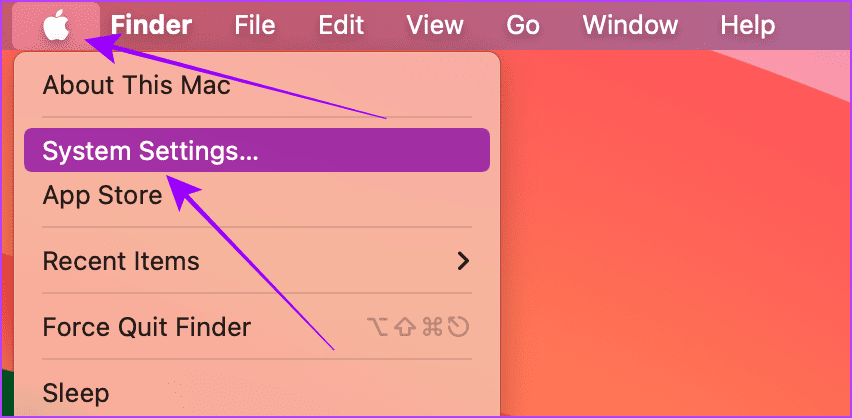
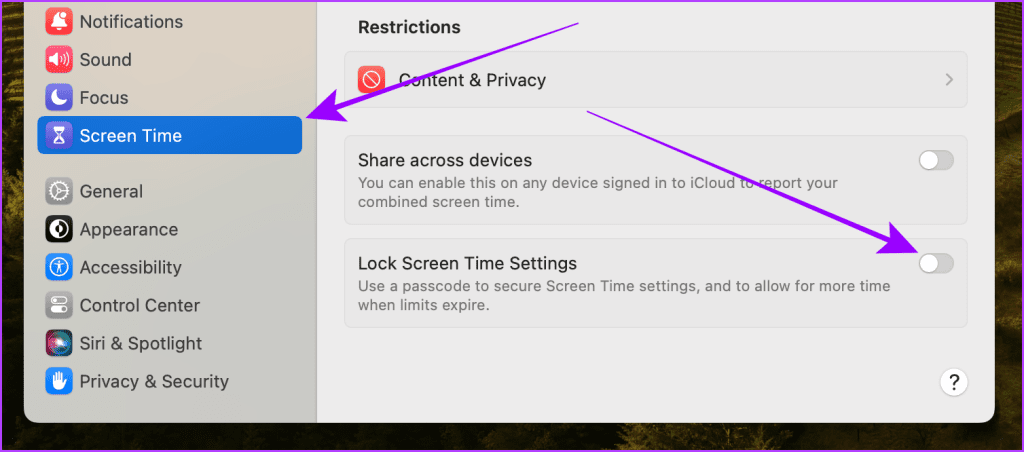
Step 1: Click the Apple logo from the menu bar and click System Settings.
Step 2: Go to Screen Time and enable the toggle for ‘Lock Screen Time Settings’.
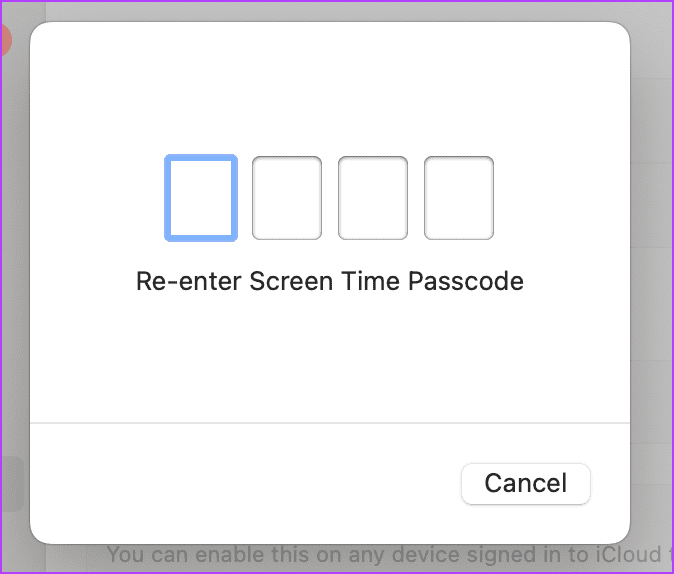
Step 3: Enter a new passcode for the Screen Time.

Step 4: Re-enter the passcode.
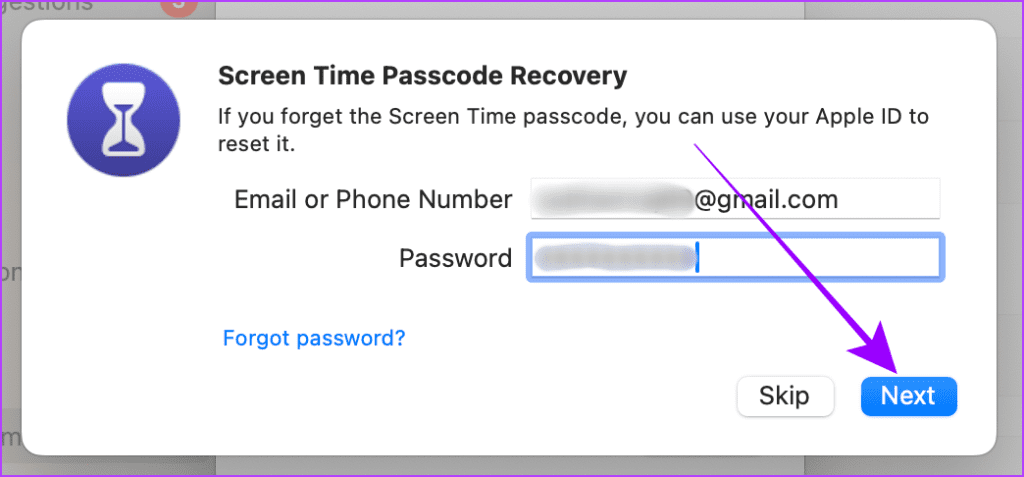
Step 5: Now, enter the Apple ID and password which you want to use for recovery.
Tip: If you are setting it up for your kid, don’t enter their Apple ID, or else they can reset the Screen Time passcode on their own.
Once you’ve set up the Screen Time passcode by following the steps mentioned above, look at how to use Screen Time to block and restrict websites on Mac and iPhone.
Method 1: Block Adult, Inappropriate, and Other Websites on Mac and iPhone
If you want to block a website in Safari on your Mac and iPhone (or iPad), worry not. The Screen Time feature is a powerful tool for privacy, restrictions, and productivity. You can use it to block inappropriate or adult websites easily. Here are the simple steps.
On iPhone
Note: This method will block websites only on Safari, not in Chrome or other browsers. But if you wish to block the Chrome browser too, scroll to the section “Restrict or Limit Websites on Mac and iPhone” and follow the steps to block the Chrome browser on the iPhone.
Step 1: Open the Settings app on your iPhone and tap Screen Time.
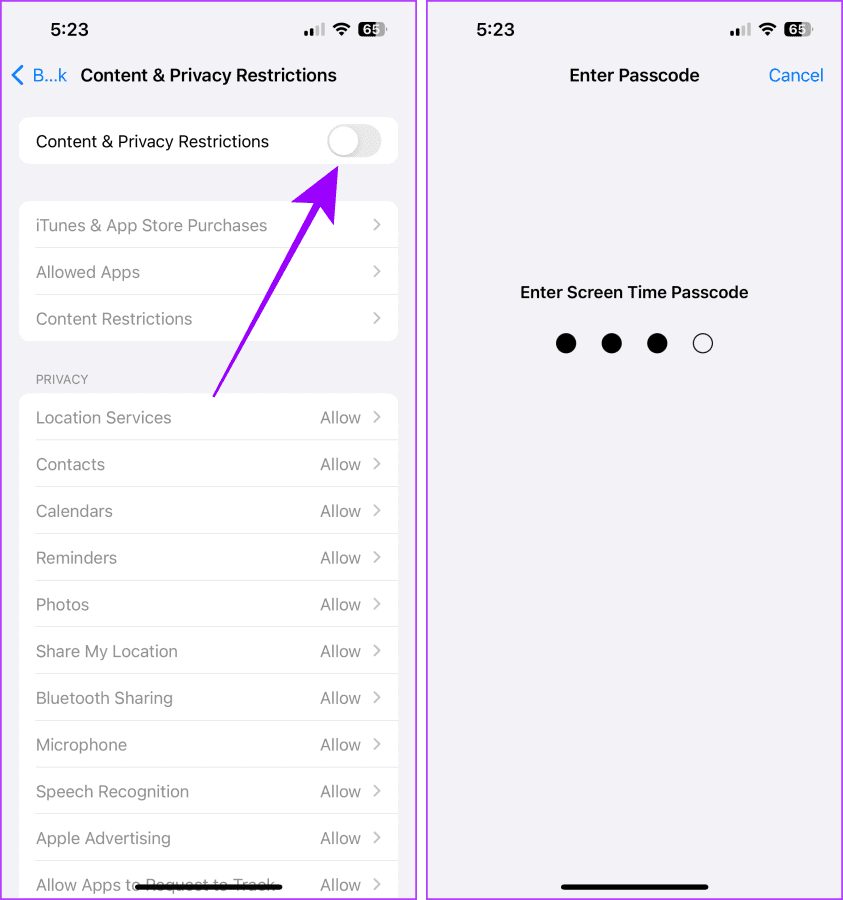
Step 2: Tap ‘Content & Privacy Restrictions’.
Step 3: Tap and turn on the toggle for ‘Content & Privacy Restrictions’.
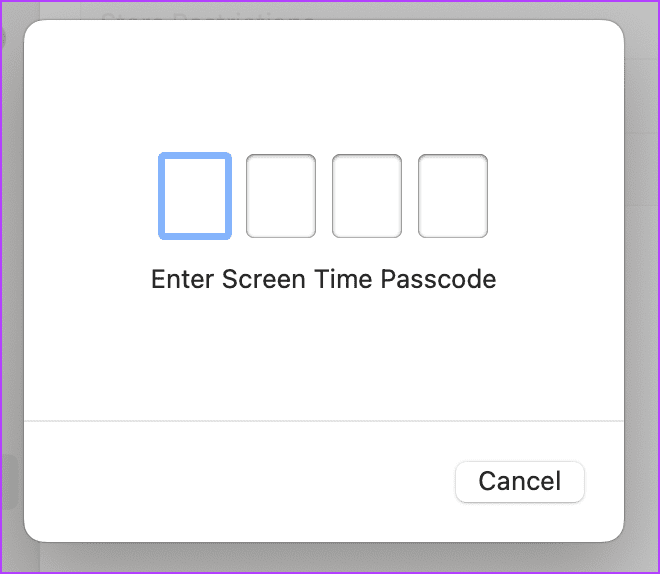
Step 4: Enter the Screen Time passcode.
Step 5: Now, tap Content Restrictions.
Step 6: Tap Web Content.
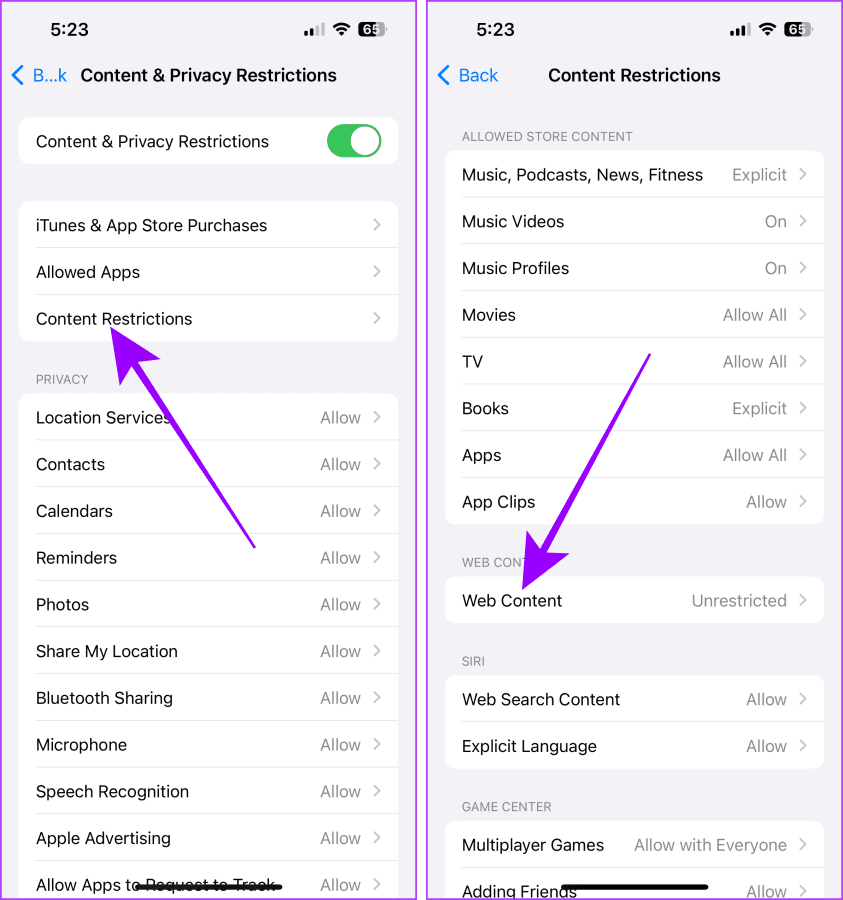
Step 7: Tap and select Limit Adult Websites.
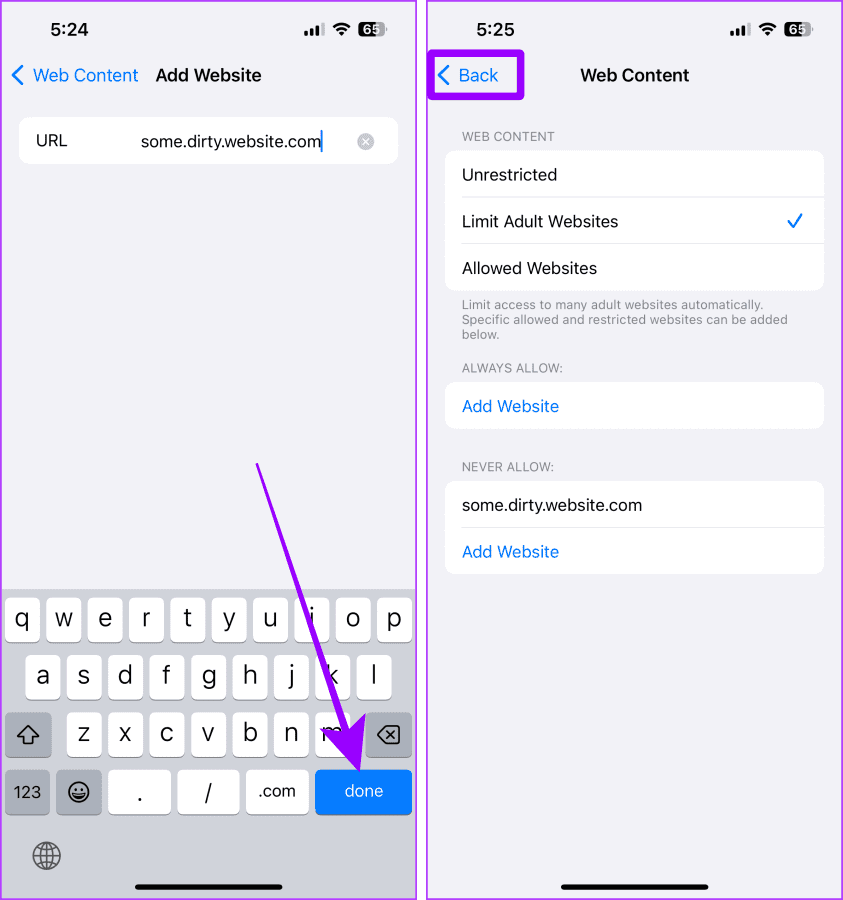
Step 8: If you want to block some more specific websites, tap Add Website under the Never Allow section.

Step 9: Type the URL for the website you wish to block and tap Done on the keyboard.
Step 10: Now, tap Back to go back to the Settings. And that’s it.
On Mac
Method 1: Using Screen Time
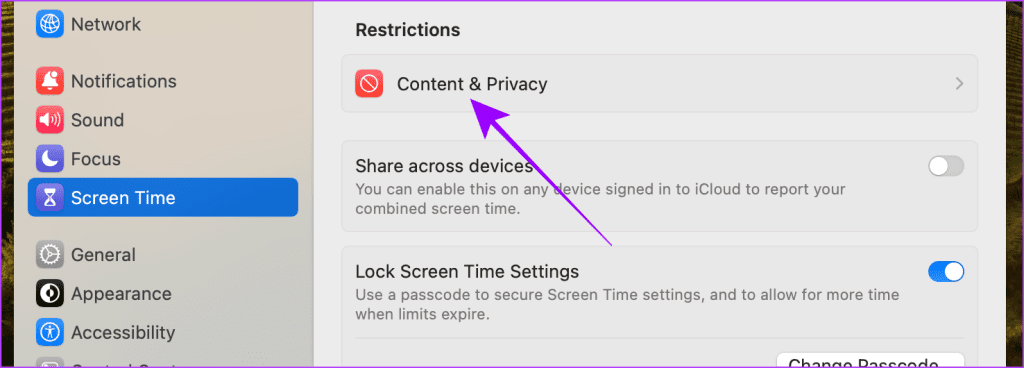
Step 1: Click the Apple logo from the menu bar and click System Settings.
Step 2: Go to Screen Time and click Content & Privacy.
Step 3: Click and turn on the toggle for Content & Privacy.

Step 4: Enter the Screen Time passcode.
Step 5: Now, click Content Restrictions.
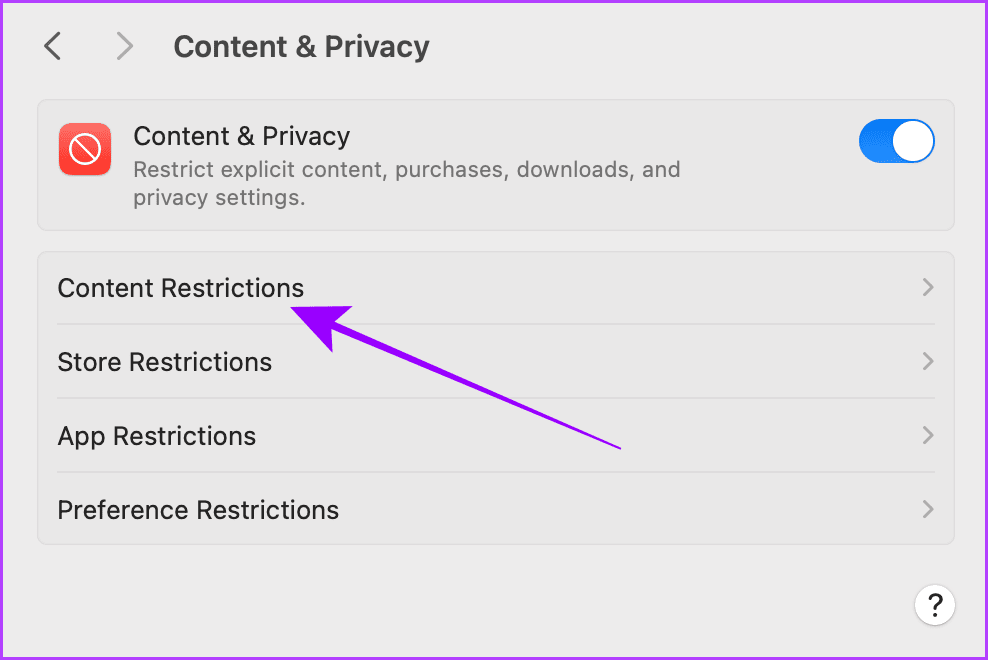
Step 6: Select Unrestricted Access.
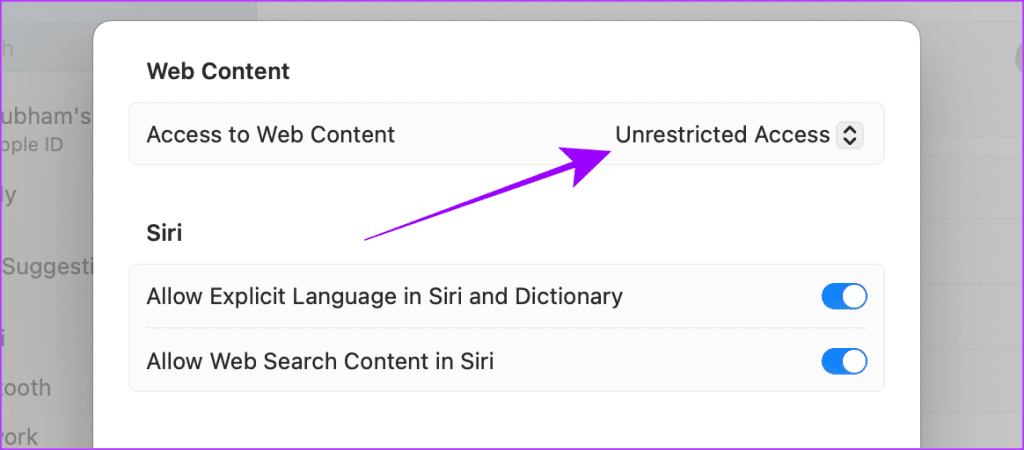
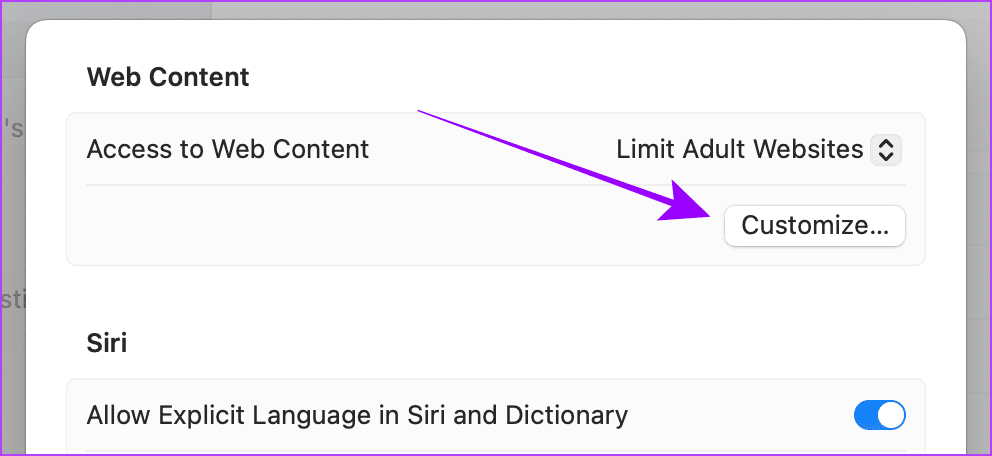
Step 7: Click and select Limit Adult Websites from the menu.

Step 8: Now, click Customize.
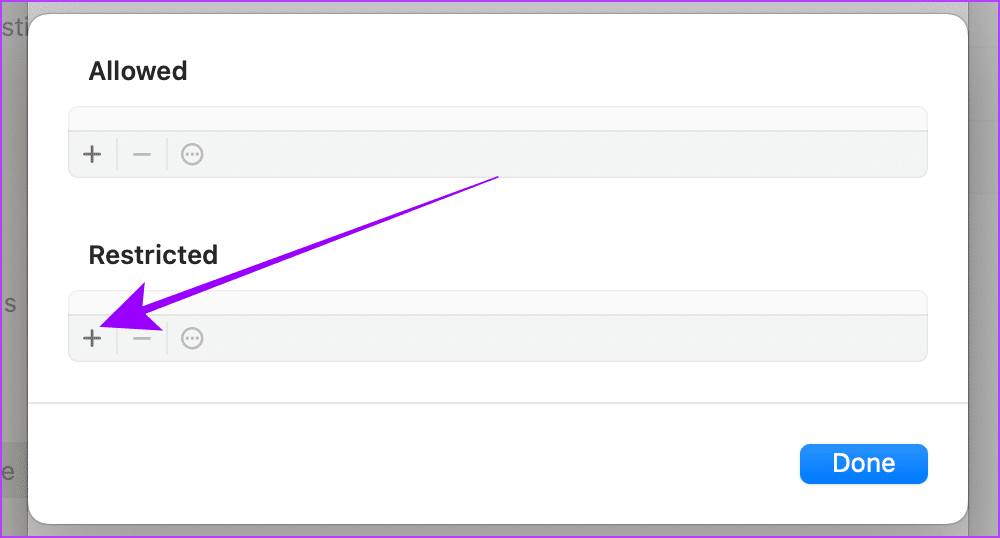
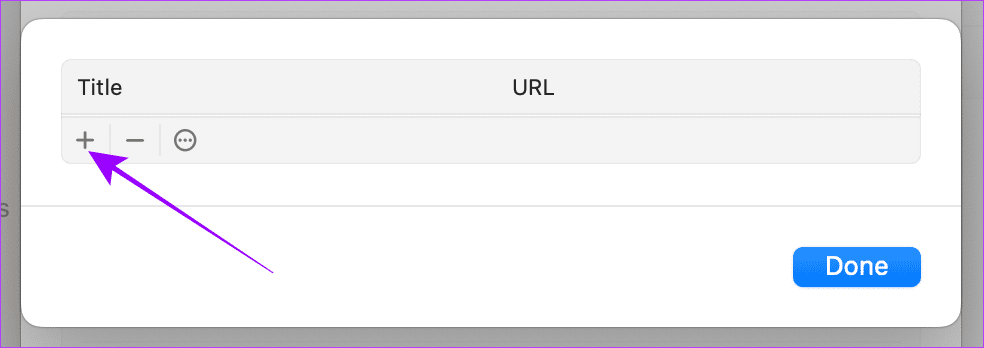
Step 9: If you wish to block some specific websites, click on + next to the Restricted section.
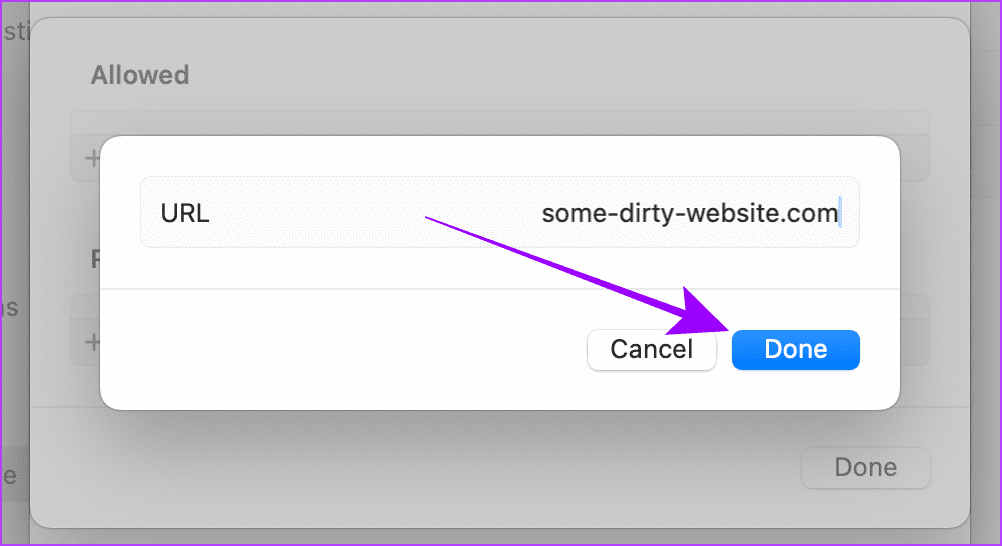
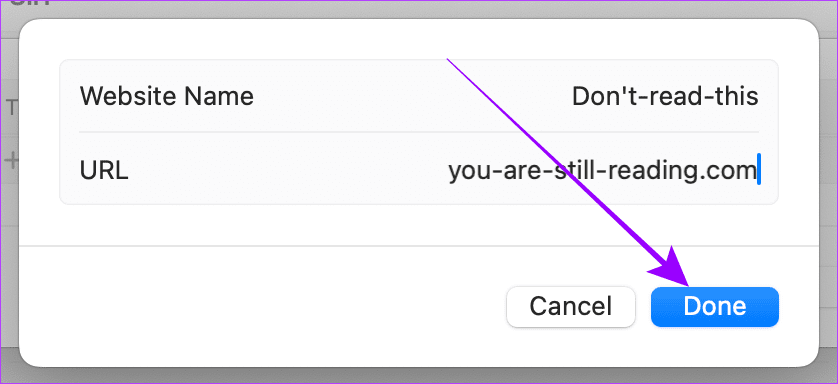
Step 10: Enter the URL for the website and click Done.
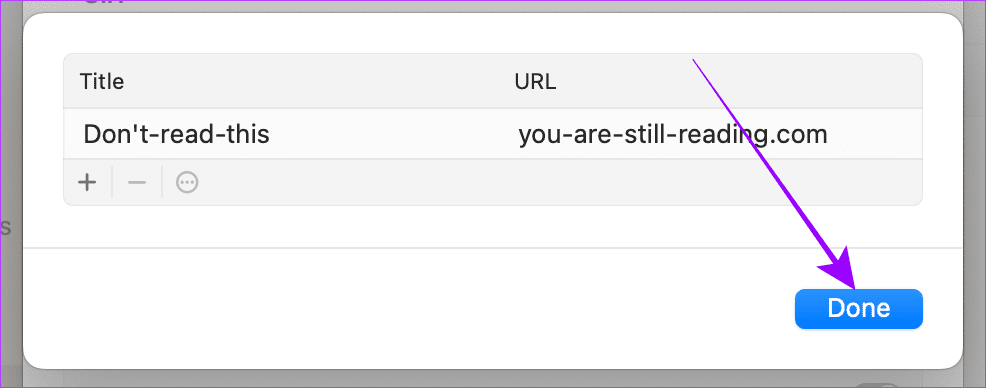
Step 11: Again, click Done.
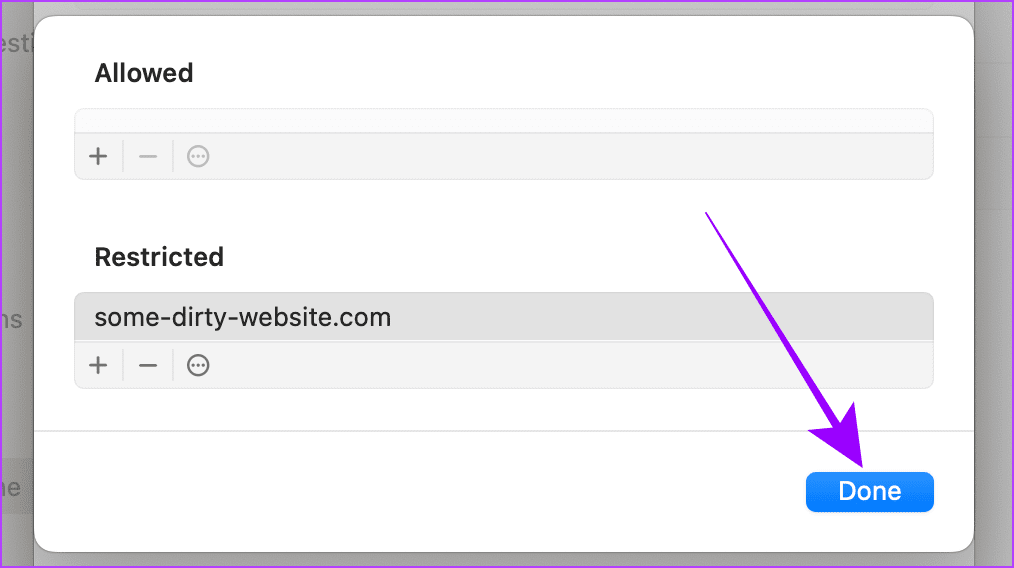
Step 12: Click Done again to save the customized settings and block the websites.
Method 2: Use a Third-Party App (SelfControl)
Since Screen Time doesn’t block websites outside of the Safari browser on your Mac, you can either restrict the Chrome app using Screen Time (discussed later in this article) or get help from a third-party app.
Here is a free and open-source app called SelfControl, which will help you block any website on your Mac on all browsers without using Screen Time.
Note: SelfControl is a strict app; once you activate the timer, you can’t access the websites (for a maximum of 24 hours) even if you uninstall the app. Hence, proceed cautiously and block only those websites you don’t need for a specific period. Once you download the app, follow the steps below.
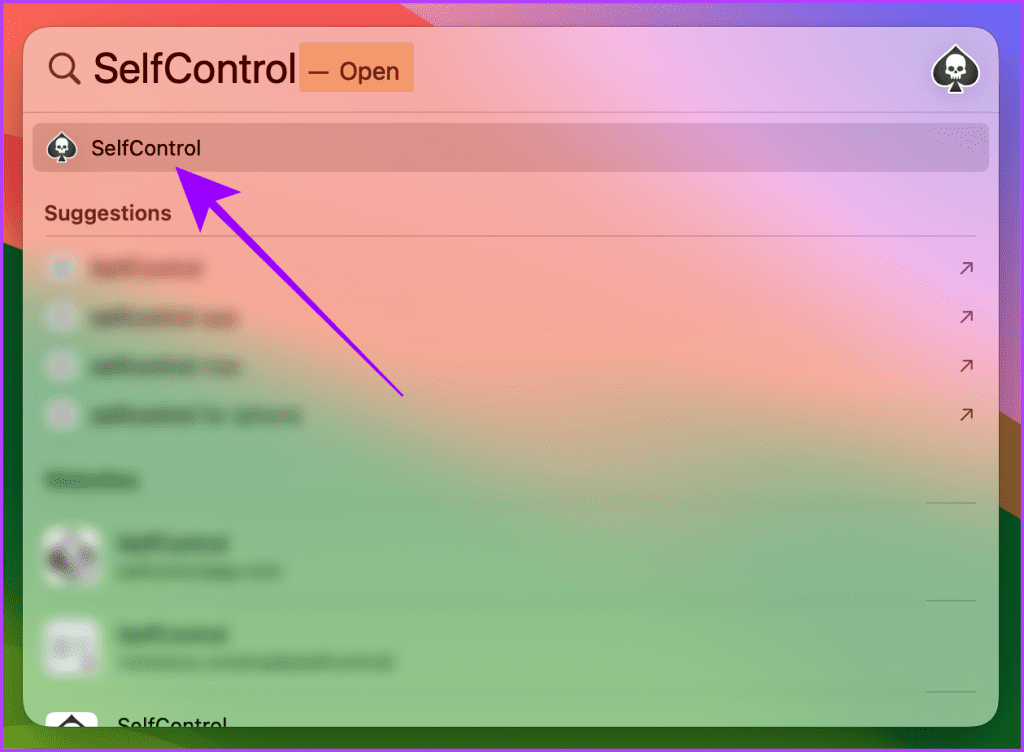
Step 1: Launch the Spotlight search on your Mac and search for SelfControl. Click to open it.
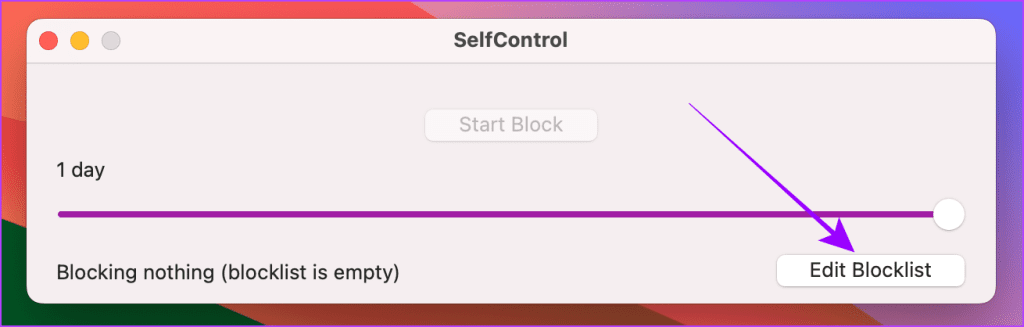
Step 2: The app will open; click Edit Blocklist.
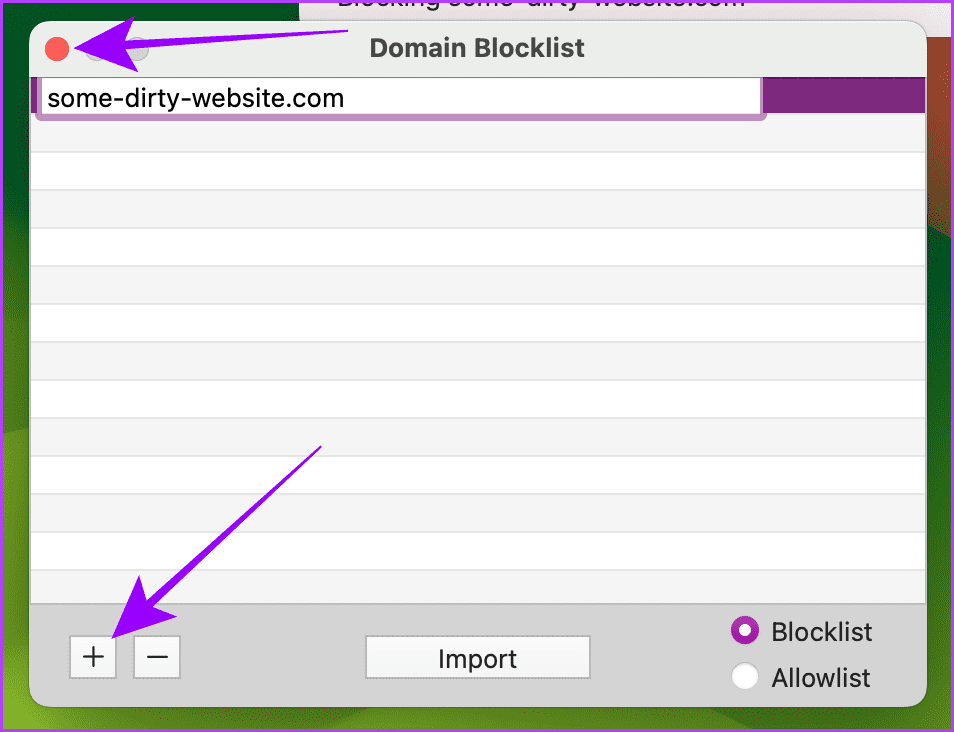
Step 3: Click on + and enter the website URL you wish to block. Now, close the pop-up window to go back to the app.
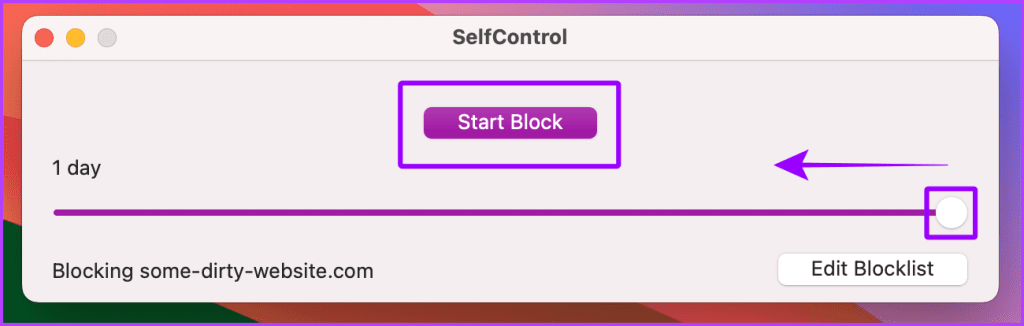
Step 4: Scroll the slider to set a timer and click Start Block.
Also Read: How to use Screen Time on Mac
Method 2: Only Allow Specific Websites on Mac and iPhone
The Screen Time feature allows only specific websites to be accessed on your Mac and iPhone. This can be helpful when you want your kid to access only specific websites in your absence. Let’s look at the steps.
On iPhone
Step 1: Launch the Settings app on your iPhone and tap Screen Time.
Step 2: Tap ‘Content & Privacy Restrictions’.
Step 3: Tap and turn on the toggle for ‘Content & Privacy Restrictions’.
Step 4: Enter the Screen Time passcode.
Step 5: Now, tap Content Restrictions.
Step 6: Tap Web Content.
Step 7: Tap Allowed Websites.
Step 8: Tap Add Website.
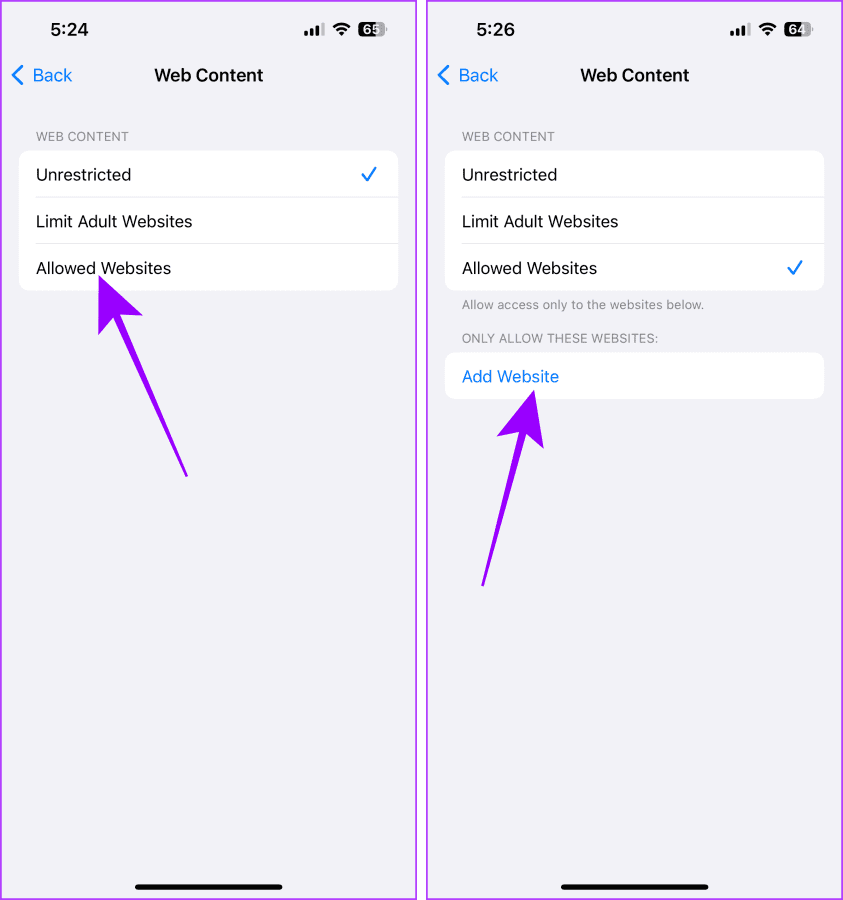
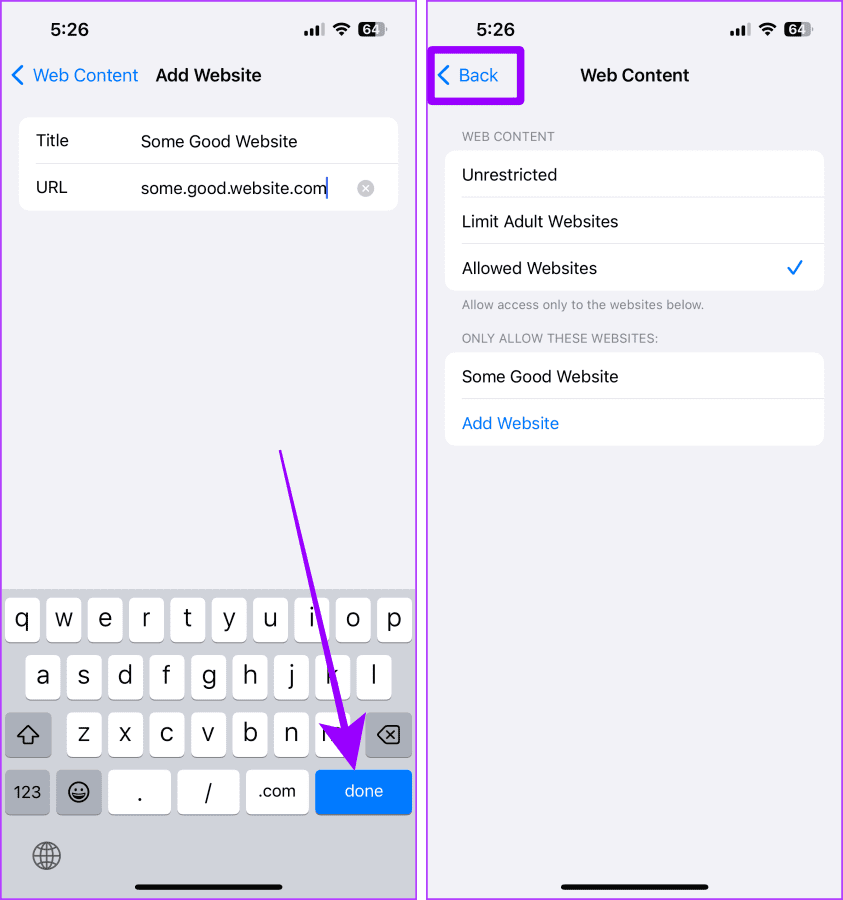
Step 9: Type the name and URL of the website and hit done on your keyboard.
Step 10: Now, tap Back to go back to the Settings. And that’s it.
On Mac
Step 1: Click the Apple logo from the menu bar and click System Settings.
Step 2: Go to Screen Time and click Content & Privacy.
Step 3: Click and turn on the toggle for Content & Privacy.
Step 4: Enter the Screen Time passcode.
Step 5: Now, click Content Restrictions.
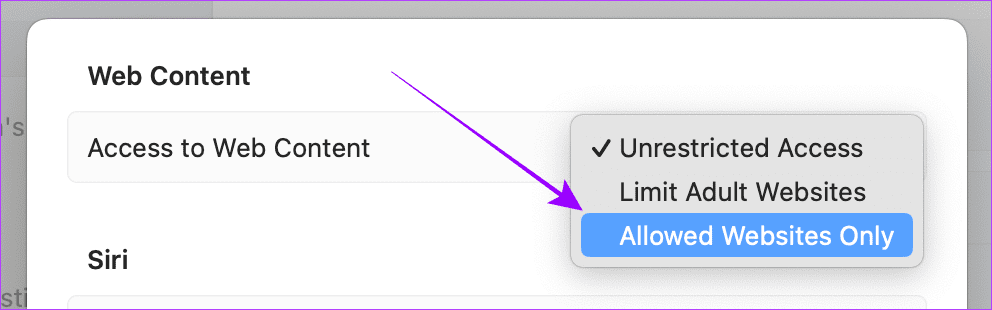
Step 6: Click Unrestricted Access.
Step 7: Click and select Allowed Websites Only from the menu.
Step 8: Now, click Customize.
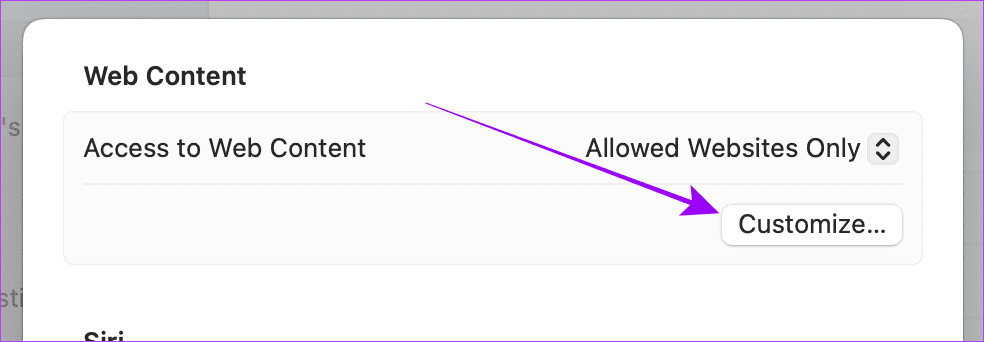
Step 9: A pop-up will open; click on the + button.
Step 10: Enter the website’s name and URL that you wish to allow on your Mac and click Done.
Step 11: Again, click Done
Step 12: Click Done one more time to save the customized settings.
Also Read: How to fix Screen Time not showing data on iPhone.
Method 3: Restrict or Limit Websites on Mac and iPhone
If you don’t want to block a website entirely, try restricting the same using Screen Time on your Mac or iPhone. This will let you restrict (or block) websites after a certain period. Here’s how you can do so.
On iPhone
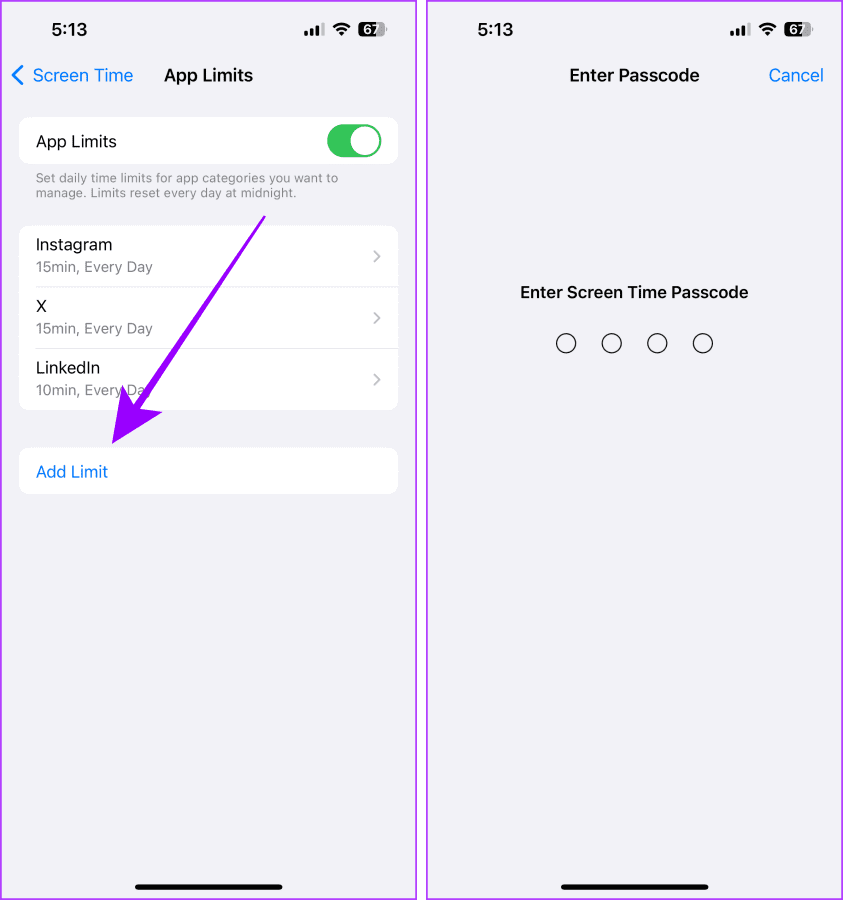
Step 1: Open the Settings app and click Screen Time.
Step 2: Tap App Limits.
Step 3: Tap Add Limit.
Step 4: Enter the Screen Time passcode.
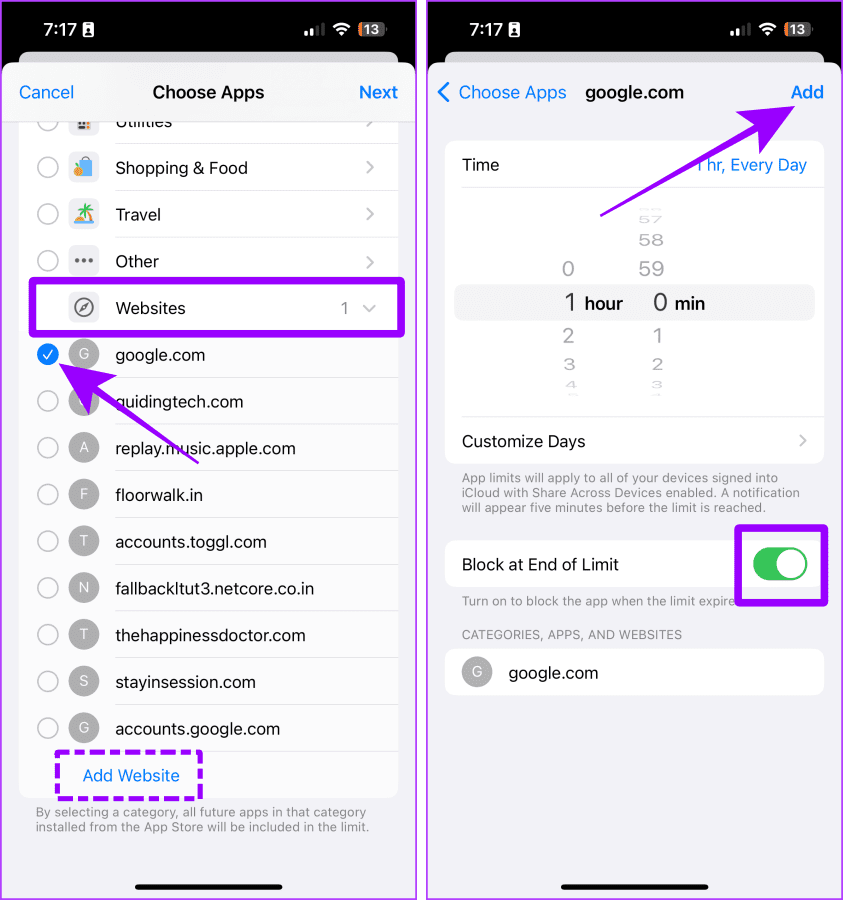
Step 5: Select the websites (or apps or even categories) and tap Next.
Tip: If a website is not visible in the list, tap Add Website.
Step 6: Set a time limit and turn on the toggle for ‘Block at End of Limit’. After that, tap Add. And that’s it.
Note: If you don’t enable ‘Block at End of Limit’, the websites will still be accessible even when the time limit runs out.
Now, the selected websites won’t be available for the specified time.
On Mac
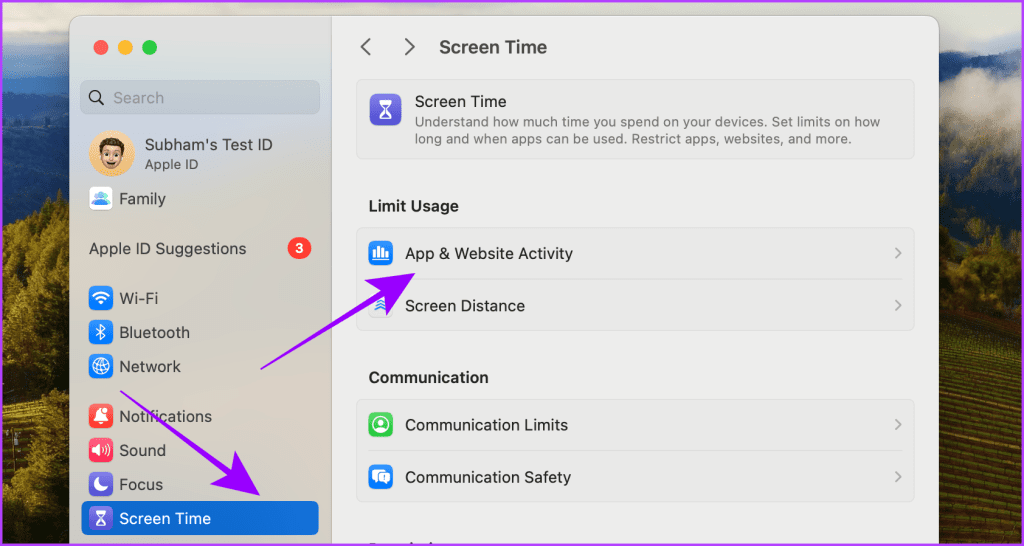
Step 1: Launch the System Settings on your Mac from the Menu bar or using the Spotlight search.
Step 2: Go to Screen Time and click ‘App & Website Activity’.
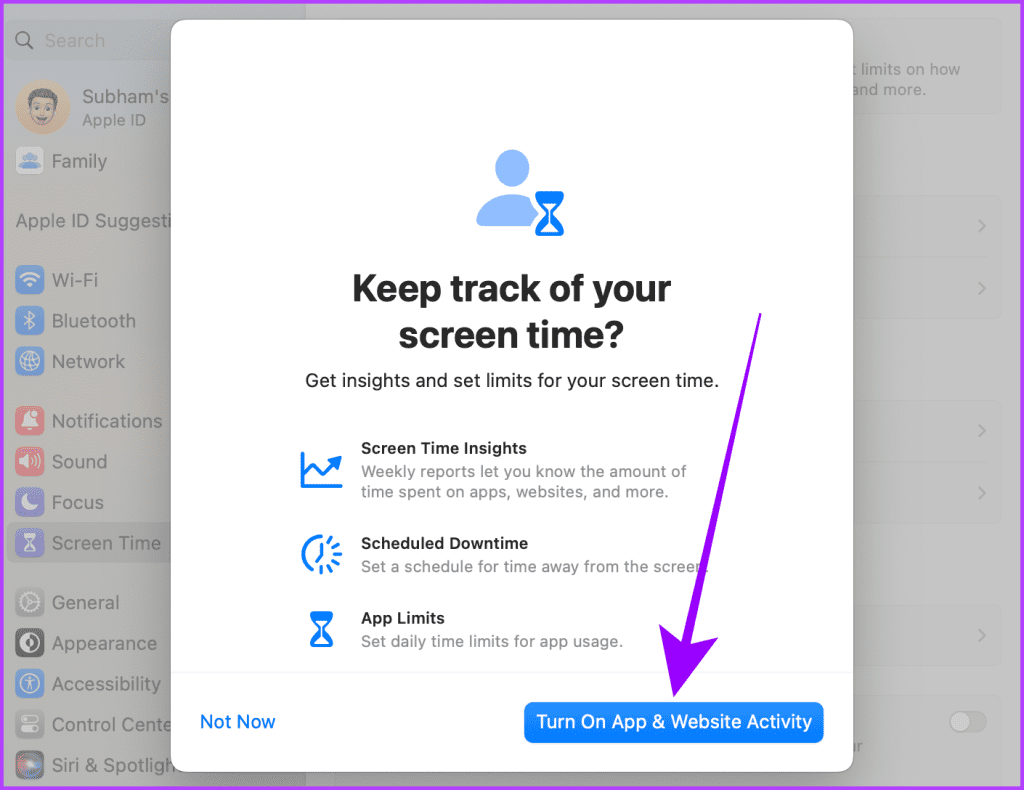
Step 3: Click ‘Turn On App & Website Activity’.
Note: This pop-up will appear if you do this for the first time.
Step 4: Now, click App Limits.
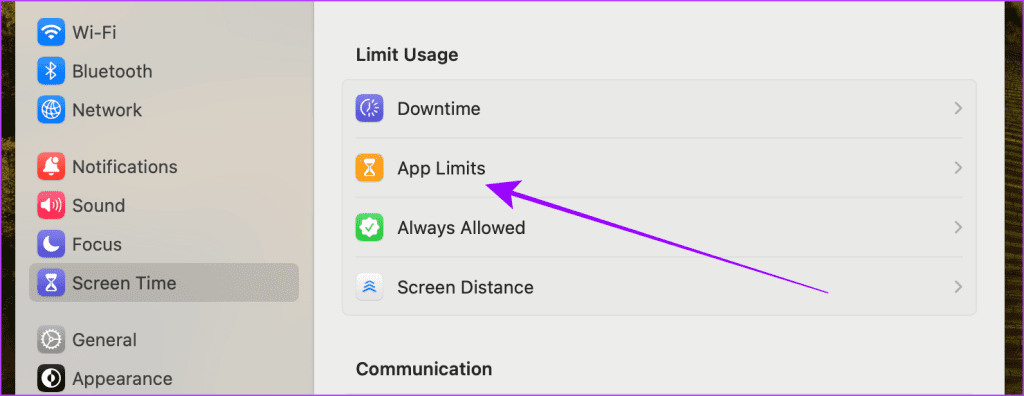
Step 5: Click and turn on the toggle for App Limits.
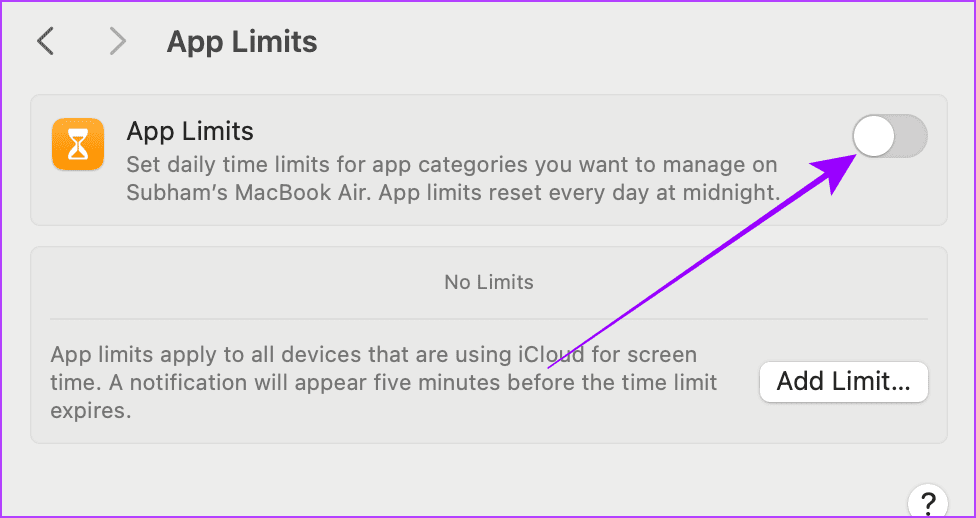
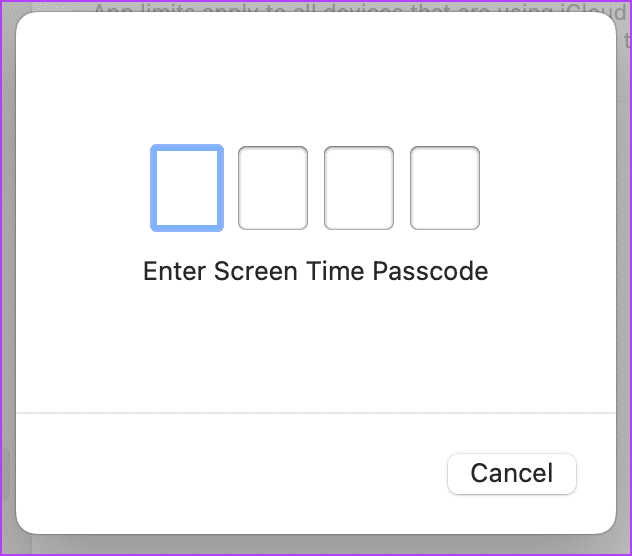
Step 6: Enter the Screen Time passcode.
Step 7: Click Add Limit.
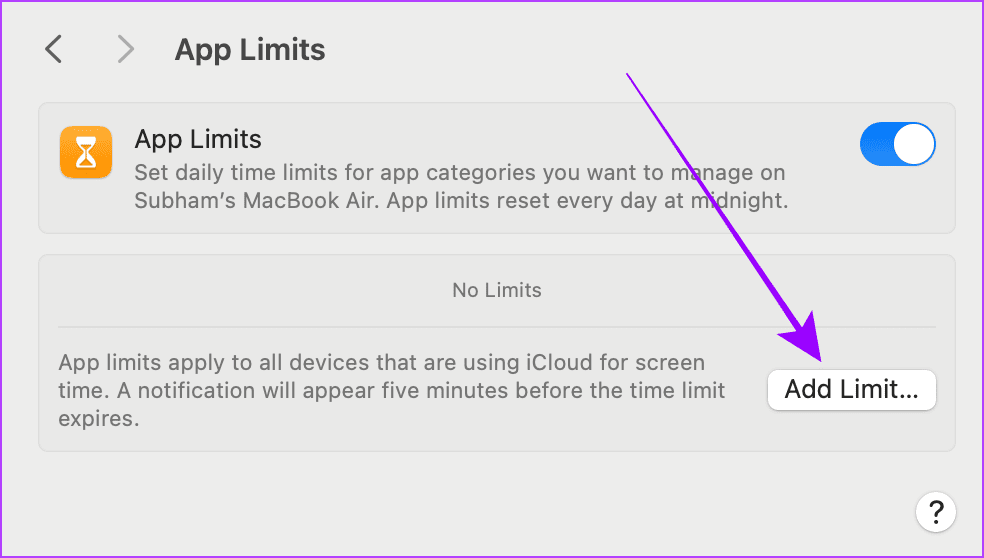
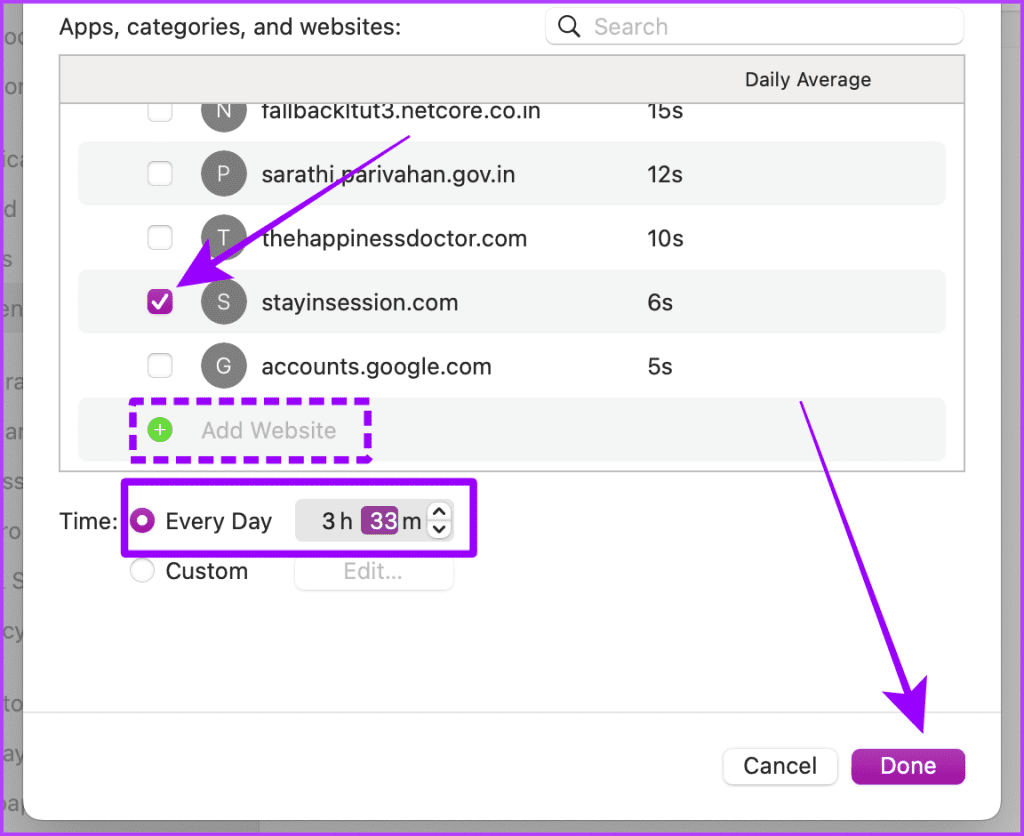
Step 8: Click on the arrow to expand the Website category.
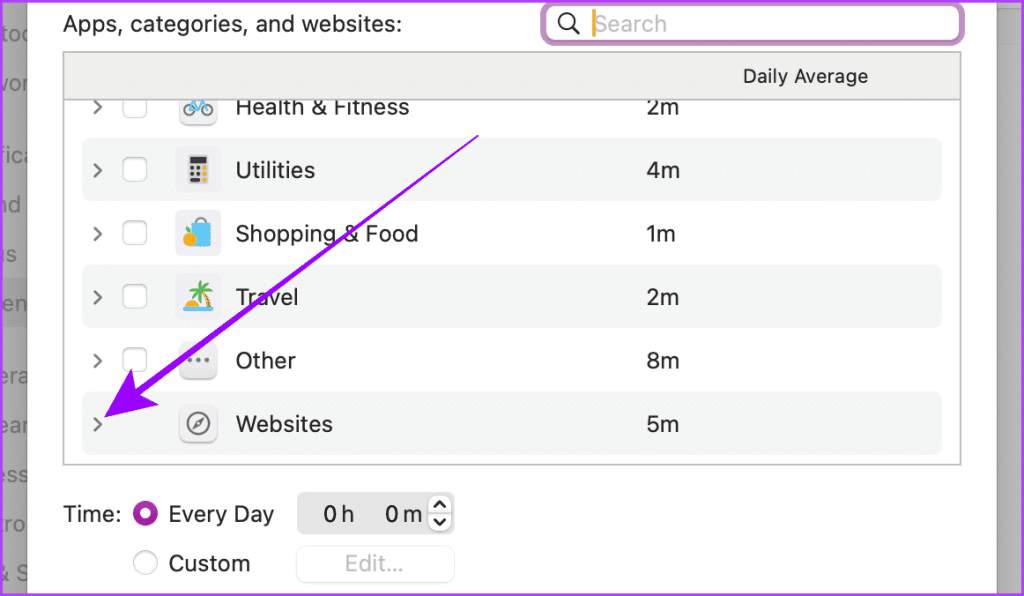
Step 9: Now, click and select websites and set a time limit for it. After that, click Done.
Tip: If the website you wish to limit is not visible in the list, click Add Website.
Restrict Websites Easily
Blocking or restricting websites is crucial in maintaining a healthy online environment. Whether you do this for your kid or to discipline yourself to be more productive, the steps mentioned in this article will help you get this done quickly.